Translating Drafting Instructions - Pants
The design of the hood was laid out in a way that made it very simple to transform it into a macro. Most designs are not as straightforward. Tutorial 2 covers something a little more complicated: a pair of pants, drafted by our Designer Leena. For now, we will simply read over the drafting instructions and translate them into a form that will make it easy to input into the macro generator.
In tutorial 3, we’ll use these notes and observations to actually plug numbers into MacroGen.
The full text of Leena’s drafting instructions is included in the end of this chapter (see drafting instructions Leena’s pants). However, for working here step-by-step, we’ve separated out her instructions and printed them In a line that looks like this to clearly differentiate Leena’s instructions from our comments and explanations.
IDENTIFYING THE NECESSARY MEASUREMENTS
To begin, open in the folder Tutorials the pants macro Tutorials - Pants.mg4. In the Style Tree select the Ladies Pants and click the Show button. Click the Measure tab at the top of the panel, and then the Edit tab on the left (you can widen the list by left-clicking and dragging the left edge of the panel to the desired width).
SIMPLE BODY MEASUREMENTS
The first step is to plan the list of body measurements with a set of default values. For this lesson we will use Leena’s default Ladies’ measurements. The complete charts are available on her web site; here we have reproduced the relevant measurements for the pants.
If some of the listed measurements look unfamiliar to you, keep in mind that Leena uses the Scandinavian Drafting System. The system you use may require different measurements. That’s okay… for your own designs you can use the system you prefer. For the purpose of these tutorials, however, we ask that you temporarily accept this system, assume for the moment that it does in fact work nicely, and follow the instructions as written.
The default measurement numbers do not have to be "right," since we only need reasonable estimates for the time being. The user will be putting in his/her own numbers when the macro is run.
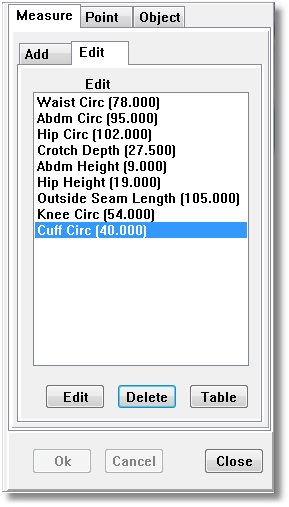
All Measurements are listed in centimeters:
Waist Circ |
78 |
+ |
Hip Height |
19 |
Abdm Circ |
95 |
+ |
Outside Seam Length |
105 |
Hip Circ |
102 |
+ |
Knee Circ |
54 |
Crotch Depth |
27.5 |
+ |
Cuff Circ |
40 |
Abdm Height |
9 |
+ |
+ |
+ |
MODIFIED BODY MEASUREMENTS
Next we note that some of these measurements are modified. We need to make a note of how they are modified:
If Abdmn Circ > (“is greater than”) Hip Circ then Hip Circ = Abdm Circ
Waist Circ = Waist Circ + 2 (for ease at the waist level)
Hip Circ = Hip Circ + 4 (for ease at the hip level)
Later we will be setting up “rules” to tell MacroGen how to handle these modified measurements. To add 2cm ease at the waist, for example, we will set up a rule that tells MacroGen, “ignore the actual waist measurement and always use Waist Circ + 2 instead.”
CALCULATED MEASUREMENTS
Do the following calculations:
This step tells us to divide some of the measurements by constants. We can skip this step in our planning because when we define points in MacroGen, we can use Scaling values to multiply or divide measurements on the spot.
PLANNING THE POINTS
Next we come to the actual drafting instructions. You may be able to do these steps in your head once you get comfortable with MacroGen, but for now, take the time to write them out.
Notation Tips:
-
Number each point sequentially and title the line with the point’s number.
-
As you study each step, draw a picture of where the point will be in the draft.
Experiment to find a notation method that works for you. Throughout this tutorial, we will use two different methods of representing the points.
-
shorthand: Anything surrounded by ( ) is the name of a point. Anything surrounded by [ ] is an offset value.
-
table: This layout gives you a simple left-to right display of what to enter in the Add Points windows. The fields are listed in the same order as you will encounter them on the forms.
DRAFT A FRAME FIRST
What points do you need to draft in MacroGen?
Generally, you need to plan on using points for four different purposes:
guide points These are used to calculate other points but aren’t actually part of the pattern. For instance, if your instructions tell you to draw a box outlining the measurements of a bodice, you’ll need to create some guide points to show where the box is. Points marking neck, waist, and hem lines are also common.
intermediate points These are also points that don’t show up in the final pattern, but they are used to help calculate other points. When your instructions tell you to do something that can’t be done in a single step with MacroGen, the solution is usually to plot one or more intermediate points, then base the next point’s location on the intermediate point. Remember Points D, L, and K from the hood in Tutorial 1 Those were intermediate points, used to add Points D2, L2, and K2 later.
points that are part of the pattern These are the ones that you’ll actually connect with lines to make the pattern. Most of them will also be used as guide points.
curve control points Remember that PatternMaker’s arcs have control points that are part of the drawing, but don’t show up in the pattern. Your drafting instructions won’t have these, so you need to remember to add them yourself. Estimating where they should go is an art you’ll learn with practice.
We can use a single point to represent a perfectly vertical or horizontal line. Unlike a paper sketch, MacroGen doesn’t need drawn guide lines, as long as you have the points the lines are based on. Many of the MacroGen functions do the equivalent of matching lines, using the X and Y coordinates of one or two points.
LET’S GET STARTED!
When the Start point is a part of our drawing, this could cause problems later on with editing the drawing. Therefore, we first create a new first point a couple of cm offset to Start. This point S will be a coordinate from Start with a X fixed distance of 5.
Coordinate (S) = (Start) + [5, none/1]
Pt. Name |
From |
X Meas |
X Scale |
X Fixed |
Y Meas |
Y Scale |
Y Fixed |
S |
Start |
None |
1 |
5 |
None |
1 |
0 |
Start by drawing a vertical line that corresponds to the outside seam length of the pants.
Coordinate (1) = (S) + [0, Outside Seam/-1]
Pt. Name |
From |
X Meas |
X Scale |
X Fixed |
Y Meas |
Y Scale |
Y Fixed |
1 |
S |
None |
1 |
0 |
OS |
-1 |
0 |
What this means to me is that I’m creating Point 1 using the Coordinate method. Its "from" point is S. Its position will be 0 in the X direction (horizontal) and -Outside Seam in the Y direction (vertical). The “-” sign in the Scale fields indicates that the direction is down (below the “from” point, rather than above it).
Draw a horizontal line at the top of the vertical line. This is the waist line of the pants.
We don’t have to do anything here since the Start point can be used as the marker for the waist line
Draw a horizontal line at the bottom of the vertical line. This is the cuff line of the pants.
Once again we don’t need to do anything more. Point 1 does this for us.
Measure down from the waist line a distance equal to the abdomen height and draw a horizontal line. This is the abdomen line.
Again, this is a Coordinate point because it is measured from one existing point (the waist line). “-1” indicates a down direction.
Coordinate (2) = (S)+ [0, Abdm Height/-1]
Pt. Name |
From |
X Meas |
X Scale |
X Fixed |
Y Meas |
Y Scale |
Y Fixed |
2 |
S |
None |
1 |
0 |
Abdm.H |
-1 |
0 |
Measure down from the waist line a distance equal to the hip height and draw a horizontal line. This is the hip line.
Coordinate (3) = + (S) + [0, Hip Height/-1]
Pt. Name |
From |
X Meas |
X Scale |
X Fixed |
Y Meas |
Y Scale |
Y Fixed |
3 |
S |
None |
1 |
0 |
HHt |
-1 |
0 |
Measure down from the waist line a distance equal to the crotch height and draw a horizontal line. This is the crotch line.
Coordinate (4) = (S) + [0, Crotch Height/-1]
Pt. Name |
From |
X Meas |
X Scale |
X Fixed |
Y Meas |
Y Scale |
Y Fixed |
4 |
S |
None |
1 |
0 |
CHt |
-1 |
0 |
Find the point midway between the crotch line and the cuff line. Draw the horizontal knee line 6cm above this point.
There is no single command that will do this. We are going to have to use a combination of the Center method and the Coordinate method. Point (5) is an intermediate point.
Center (5) = (1) ,( 4)
Pt. Name |
From |
To |
5 |
1 |
4 |
Center (6) = (5 ) + [0, 6]
Pt. Name |
From |
X Meas |
X Scale |
X Fixed |
Y Meas |
Y Scale |
Y Fixed |
6 |
5 |
None |
1 |
0 |
None |
1 |
6 |
The Y Fixed Distance of “6” means Point 6 is placed 6cm vertically from Point 5.
PANTS FRONT
We’ve just done the equivalent of drawing the guide lines that determine the overall shape of the pants. Now, we’re going to go through the instructions and plot the rest of the pants, step by step. Are there any more major decisions we have to make before we start drafting points? Leena’s drafting instructions are organized so that from this point on, you can just go around the pattern and plot each point. If you’re making a macro of your own patterns, you may need to think ahead here and make sure you’re doing things in the order they need to be done.
Divide the waist circumference (+ease) by 8. On the waist line, measure this distance to the left from the pants center line. Mark this point as the center front point of the waist.
This will be a Coordinate point, because it is measured from one single existing point (the pants center line, the Start point). Measuring to the left requires using a negative number in the Scale field; “8” indicates that we are dividing the Waist Circ measurement by 8. (Remember, wherever you see Waist Circ, it actually equals Waist Circ +2 because of the added ease.)
Coordinate (7) = (S) + [Waist Circ/-8, 0]
Pt. Name |
From |
X Meas |
X Scale |
X Fixed |
Y Meas |
Y Scale |
Y Fixed |
7 |
S |
WC |
-8 |
0 |
None |
1 |
0 |
Divide the waist circumference (+ease) by 8 and add 3 cm. On the waist line, measure this distance to the right from the pants center line. Mark this point as the side front point of the waist. Of the extra 3 cm, +2 cm is for the dart and +1 cm is to move the side seam 1 cm towards the back to prevent them from showing. The side point is raised by 1 cm.
This step uses a Coordinate point with a combination of the Measurement, Scale and Offset fields. Using an X-Scale of “8” is how we indicate that the Waist Circ measurement is divided by 8. The X-Offset of “3” represents the 3cm added to that waist amount.
Coordinate (8) = (S) + [Waist Circ/8 + 3, 1]
Pt. Name |
From |
X Meas |
X Scale |
X Fixed |
Y Meas |
Y Scale |
Y Fixed |
8 |
S |
WC |
8 |
3 |
None |
1 |
0 |
On the waist line, measure 4.5 cm to the right from the pants center line and start the front dart from there. Make the dart 2cm wide. The dart extends from the waist line to the abdomen line. Draw the right side of the dart so that it forms a right angle where it meets the abdomen line.
This is going to require us to create three points. The first (9) is the start of the dart. (10) is the end of the dart. (11) is the center of the dart.
Coordinate (9) = (S) + [4.5, 0]
Pt. Name |
From |
X Meas |
X Scale |
X Fixed |
Y Meas |
Y Scale |
Y Fixed |
9 |
S |
None |
1 |
4.5 |
None |
1 |
0 |
Coordinate (10) = (9) + [2, 0]
Pt. Name |
From |
X Meas |
X Scale |
X Fixed |
Y Meas |
Y Scale |
Y Fixed |
10 |
9 |
None |
1 |
2 |
None |
1 |
0 |
Since Point 11 forms a right angle with an existing line (represented by a single point, in this case), we can use the Rectangle point type. Remember, this point type uses a horizontal position (X) of one point and the vertical position (Y) of a second point.
For Point 11, we’ll use the X (sideways) position of Point 10, and the Y (up-and-down) position of Point 2.
Rectangle (11) = { (10), (2) }
Pt. Name |
XCoord |
YCoord |
11 |
10 |
2 |
Now we notice that the last leg of the dart isn’t as long as the first leg. We can fix this by creating another point. We will have to create an Distance measure to ensure that the distances always match. The measurement M1 will represent the distance from Point 9 to Point 11, whatever that happens to be. Using an Distance measurement ensures that both legs of the dart are always the same length.
Distance measure (M1) = Distance { 9, 11}
M. Name |
From |
To |
M1 |
9 |
11 |
Now we use M1 as the Y Measurement for Point 12:
Coordinate (12) = (11) + [0, M1]]
Pt. Name |
From |
X Meas |
X Scale |
X Fixed |
Y Meas |
Y Scale |
Y Fixed |
12 |
11 |
None |
1 |
0 |
M1 |
1 |
0 |
Divide the hip circumference (+ ease) by 8 and subtract 2cm. On the hip line measure this distance to the left from the pants center line. Mark this point as the center front point of the hip.
The instructions tell us to place the point to the left of the pants’ center. We know that this means it will be in the “negative-x” direction. But subtracting 2 from that number means we are decreasing that distance; it is actually less than the 1/8 hip measurement. So we move “not as far” in the “negative-x” direction, or, back in the “positive-x” direction. This is why the X Fixed Distance of “2” is positive, rather than negative.
Coordinate (13) = (3) - [ Hip Circ/8 - 2 , 0]
Or more simply:
Coordinate (13) = (3) + [Hip Circ/-8 + 2 , 0]
Pt. Name |
From |
X Meas |
X Scale |
X Fixed |
Y Meas |
Y Scale |
Y Fixed |
13 |
3 |
HC |
-8 |
2 |
None |
1 |
0 |
Divide the hip circumference (+ ease) by 8 and add 2 cm. On the hip line measure this distance to the right from the pants center line. Mark this point as the side front point of the hip.
Measure to the right means the Scale will be a positive number. Add 2cm means we are increasing the distance from the center line; therefore the X-Fixed Distance of 2 is a positive number.
Coordinate (14) = (3) + [Hip Circ/8 + 2 , 0]
Pt. Name |
From |
X Meas |
X Scale |
X Fixed |
Y Meas |
Y Scale |
Y Fixed |
14 |
3 |
HC |
8 |
2 |
None |
1 |
0 |
Draw a vertical line from the center hip point downwards to the crotch line and mark this point.
We will use the Rectangle point type again here. The X (side-to-side) position matches the center hip, Point 13, and the Y (up and down) position matches the crotch line, Point 4.
Rectangle (15) = { (13), (4) }
Pt. Name |
From |
To |
15 |
13 |
4 |
From the marked point (15) measure x-1 cm to the left and mark. Mark this point as the tip of the front crotch curve. ‘X’ is calculated by dividing the hip circumference by 20.
Again, we’re measuring less than X to the left. That means the Scale is negative (to the left), but the Fixed Distance is positive (back towards the right). The Scale of “-20” divides Hip Circ by 20, and places the point to the left of Point 15.
Coordinate (16) = (15) + [Hip Circ/-20 +1 , 0]
Pt. Name |
From |
X Meas |
X Scale |
X Fixed |
Y Meas |
Y Scale |
Y Fixed |
16 |
15 |
HC |
-20 |
1 |
None |
1 |
0 |
We could also have created a math. measure for Hip Circ. You will often find more than one way to accomplish something. It is a simply a matter of preference.
Divide the desired knee circumference by 4 and subtract 1 cm. On the knee line measure this distance to the left and to the right from the pants center line. Mark these points as the knee point of the front pant.
To measure to the left of the knee point, we use a Scale of -4. The X Fixed Distance of “1” moves the point back to the right.
To measure to the right of the knee point, the Scale is positive. The X Fixed Distance of “-1” moves the point back to the left.
Coordinate (17) = (6) + [Knee Circ/-4 + 1, 0]
Pt. Name |
From |
X Meas |
X Scale |
X Fixed |
Y Meas |
Y Scale |
Y Fixed |
17 |
6 |
KC |
-4 |
1 |
None |
1 |
0 |
Coordinate (18) = (6) + [Knee Circ/4 - 1, 0] a|
Pt. Name |
From |
X Meas |
X Scale |
X Fixed |
Y Meas |
Y Scale |
Y Fixed |
18 |
6 |
KC |
4 |
-1 |
None |
1 |
0 |
Divide the desired cuff circumference by 4 and subtract 1cm. On the cuff line, measure this distance to the left and to the right from the pants center line. Mark these points as the cuff point of the front pants.
These cuff points are positioned in the same way as the knee points. Coordinate (19) = (1) + [Cuff Circ/-4 + 1, 0]
Pt. Name |
From |
X Meas |
X Scale |
X Fixed |
Y Meas |
Y Scale |
Y Fixed |
19 |
1 |
CC |
-4 |
1 |
None |
1 |
0 |
Coordinate (20) = (1) + [Cuff Circ/4 - 1, 0] a|
Pt. Name |
From |
X Meas |
X Scale |
X Fixed |
Y Meas |
Y Scale |
Y Fixed |
1 |
1 |
CC |
4 |
-1 |
None |
1 |
0 |
PLANNING A CURVE
Before playing connect-the-dots and placing all the lines we need to think about where we want to have curves. Curves can be a bit tricky because they require a corner point. The corner point controls the amount of curvature. Also, the designs never clearly state where a corner point should be placed. We have to use some intuition to figure out where they need to go.
There are a few rules to remember in placing corner points:
-
To have a curve join cleanly to a line, have the corner point be on the continuation of the line.
-
This means that if you want a curve to smoothly connect two lines, the corner point needs to be at the intersection of those lines.
-
To have a corner point connect cleanly to another curve, place the new corner point on the line formed by the corner point and the connecting point of the previous curve. In other words, the above two rules apply if you use the first curve’s corner point as part of an imaginary line.
-
To have a curve come off a line at a right angle, have the corner point be at a right angle to the line.
-
The same applies to a curve coming off of a curve.
In the illustrations below, the green Xs represent the corner points. The shape of the curve is controlled by moving the corner points. Moving the corner point farther from the end points (blue) results in a sharper curve (not shown).
 A. Curve joining a line
 B. Curve joining two lines
 C. Smooth curve-to-curve
 D. Curve at a right angle
 E. Angle curve-to-curve
We are going to place corner points in two places: the crotch and the line connecting the hip and waist. First, let’s figure out the corner point for the hip. We want it to flow smoothly from the leg, so, according to rules A and B above, the corner point needs to be part of both the leg line and the waist line. We can achieve this by placing the point at an intersection of the two lines.
Line Line Intersect (21) = { (18)-(14), (7) (Start) } a|
Pt. Name |
1 Start |
1 End |
2 Start |
2 End |
S21 |
S18 |
S14 |
S7 |
S |
Next comes the crotch curve. Again, we are going to want it to flow smoothly down from the waist center front line, but it also needs to come in at a right angle to the leg line. We can’t intersect with the crotch line (represented by Point 4), because that isn’t perpendicular to the leg line. We will have to create a point that is perpendicular, and then use that point as part of a line. Then we will intersect the two lines.
Right Angle (22) = { (17), (16), 5}
Pt. Name |
From |
Corner |
Dist |
Meas |
Scale |
Dir |
22 |
17 |
16 |
5 |
None |
1 |
CW |
(Notice that although we chose “5” for the distance, it is an arbitrary choice since we are only using it to define a line. MacroGen doesn’t care how long or short the line is.)
Line Line Intersect (23) = { (16)-(22), (7)-(13) }
Pt. Name |
1 Start |
1 End |
2 Start |
2 End |
S23 |
S16 |
S22 |
S7 |
13 |
CONNECT THE POINTS FOR PANTS FRONT
Now it’s time to play connect-the-dots. The points are connected as follows:
7 |
Line |
13 |
XArc |
23 |
Corner |
16 |
Line |
17 |
Line |
19 |
Line |
20 |
Line |
18 |
Line |
14 |
XArc |
21 |
Corner |
8 |
Line |
12 |
Line |
11 |
Line |
9 |
Line |
ADD A ZIPPER FACING
Draft the facing for the zipper, 3 cm wide and 18-20 cm high (according to the length of the zipper you are going to use), at the top of the front pant’s center line
Point 24 is the width of the zipper facing (3cm). The X Fixed Distance of -3 puts Point 24 to the left of Point 7, the waist center front:
Coordinate (24) = (7) + [-3, 0]
Pt. Name |
From |
X Meas |
X Scale |
X Fixed |
Y Meas |
Y Scale |
Y Fixed |
24 |
7 |
None |
1 |
-3 |
None |
1 |
0 |
For the purposes of this lesson, we will use a fixed zipper length of 20cm. Point 25 needs to represent a position 20cm below Point 7, along the line from Point 7 to Point 13. To “continue” an existing line to a new point, we will use the continue line type.
If we knew that the distance from Point 7 to Point 13 was, for example, 15cm and would never change, we could simply say, “start at point 7, go through point 13, and continue on for 5 more centimeters” to equal 20cm. However, the distance from 7 to 13 will be different for each person. Therefore, the only way to make sure that we measure 20cm from Point 7 is to begin at Point 13, measure up to Point 7, then measure back down 20cm. Wherever we end up is where Point 25 will be located. (Theoretically, this could be on either side of Point 13, especially if a different zipper length is used.)
Continue (25)
Pt. Name |
Start |
End |
Meas |
Scale |
Dist |
25 |
7 |
13 |
None |
1 |
-20 |
Point 26 forms the bottom of the zipper facing. It is a right angle off of the line formed by Points 7 and 25, and it is 3cm wide:
Right Angle (26) = { (7), (25), 3 }
Pt. Name |
From |
Corner |
Dist |
Meas |
Scale |
Dir |
26 |
7 |
25 |
3 |
None |
1 |
CCW |
Finally, we will connect the points to create another new Object, the zipper facing:
7 |
Line |
24 |
Line |
26 |
Line |
25 |
Line |
Now that you have an overview of what we’re going to be doing, let’s go ahead and do it in Lesson 3.