Style Dependant Measures
The final feature we will cover in this lesson is Style Dependent Measures. Style Dependent measures are often used together with style exclusions, but as you will see, they have a different effect, and can also be used independently.
You already know how to create prompted measurements. These are used in virtually every macro. Style depended measures are also prompted, but they only appear if the user has chosen a particular style. These measurements will not appear in all “paths” of the macro. For example, let’s say you have a pants macro that offers two styles: zipper waistband or elastic waistband. If the user chooses “elastic waistband,” you don’t want a prompted measurement asking for the zipper length.
Add a new style
To illustrate the Style Dependent measures, we’re going to add a new style to our Bodice.
-
Open the project BodiceWithStyleExclusions.mg4
-
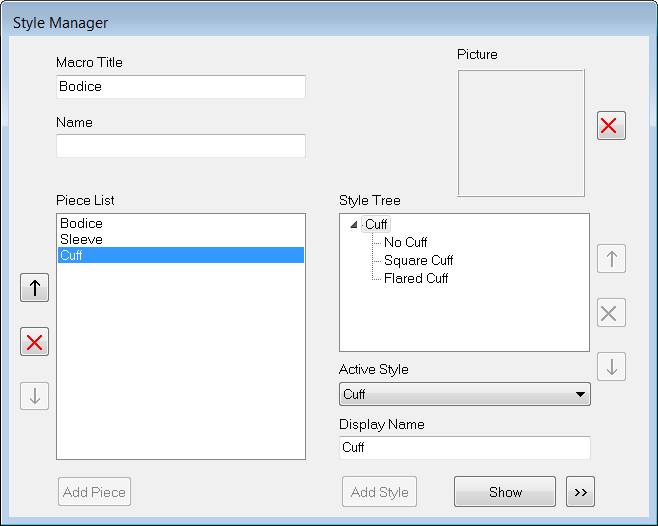
In the Style Manager select “Cuff” in the Piece List.
-
“Cuff” in the Style Tree is highlighted. In the Name field, type “Flared Cuff,” and click the “Add Style ” button.
-
Double-click “Flared Cuff” to open its editing window.
Add style dependent Measures
Now we need to define the style dependent measures.
-
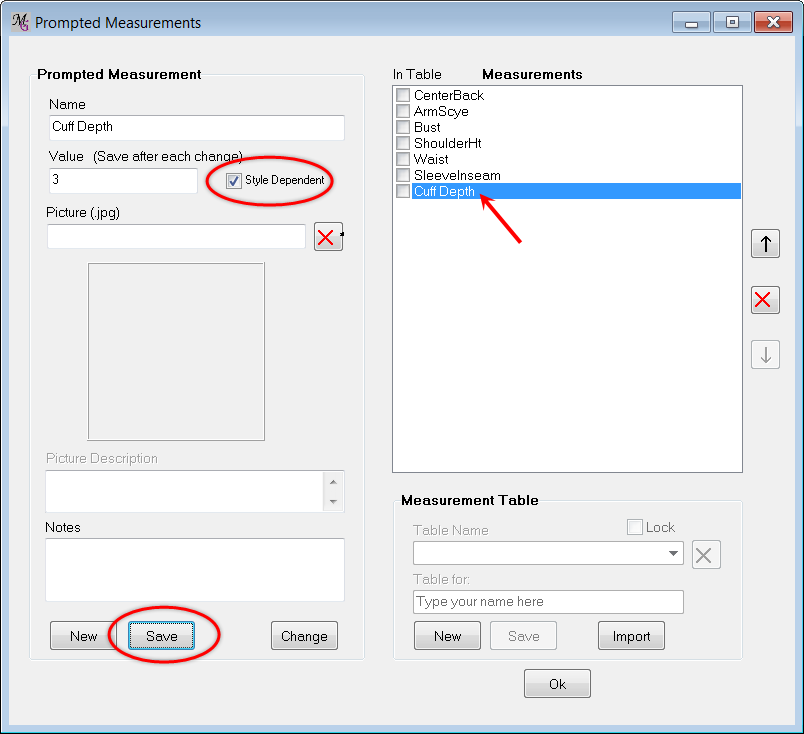
From the tabs, select Measure / Add / Prompted. The Prompted measurements form opens.
-
In the name field New is already highlighted, you can overwrite this with the new measurement name Cuff Depth with a default value of 3.
-
Check the Style Dependent box to indicate that this measurement is used only in some styles.
-
Click the Save button at the bottom left to save the new measurement in the Measurements list at the right.
-
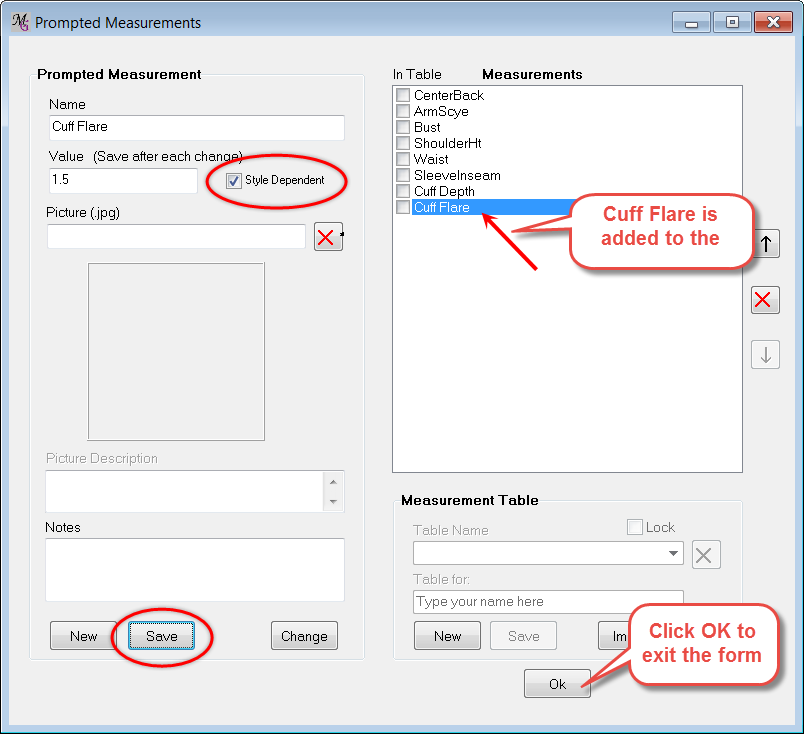
Click the “New” button at the left bottom to create a second measurement called “Cuff Flare” with a default value of 1.5.
-
Check the Style dependent box.
-
Click the Save button at the bottom left.
-
Click the OK button at the right bottom to save you added measurements.
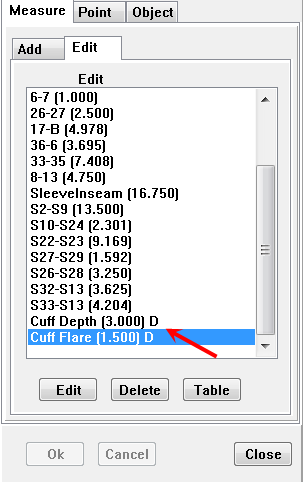
After saving the Style Dependent measurements, in Measure/Edit a D behind a measure indicates that the Style Dependent box is checked
Add points and create new object

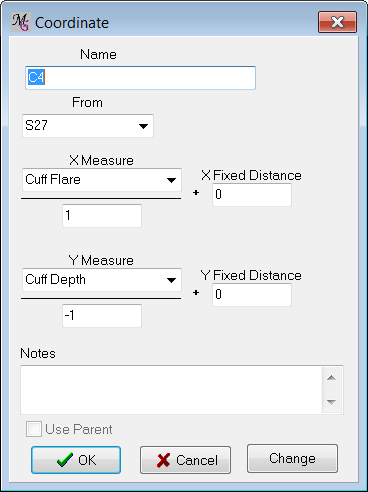
Name |
C3 |
|
From |
S23 |
(to enter points faster type S23 and MG will jump to S23, click at it and it is selected) |
X Measure |
Cuff Flare |
X Scale |
-1 |
Y Measure |
Cuff Depth |
Name |
C4 |
From |
S27 |
X Measure |
Cuff Flare |
X Scale |
1 |
Y Measure |
Cuff Depth |
Y Scale |
-1 |
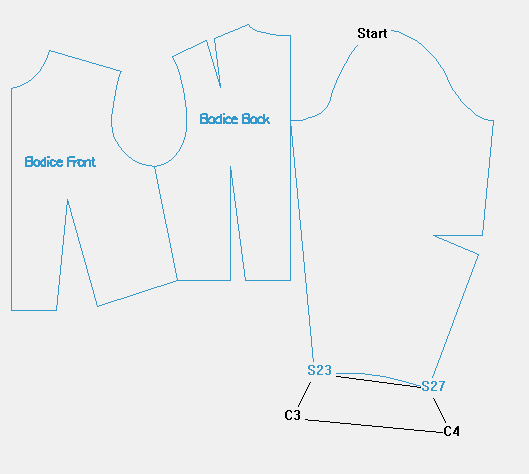
From the tab Object, create a new object:
Name: Flared Cuff
(If you can’t see your new points, go back and make sure no options are showing for the Bodice and Sleeve Pieces, and then double-click on the Flared Cuff style to open your Style Window.)
Connect the points as follows: * S23 (Line) * S27 (Line) * C4 (Line) * C3 (Line) * Check the Closed box. * Click OK to save you Flared cuff object
The drawing now displays the flared cuff piece.
|image:8_021_flaredcuffobject.zoom75.pn
Set style dependent Measures
Now we will assign these style dependent measurements to a particular style, here the Flared Cuff style.
-
Close the Tabs panel (and the drawing area) and go back to the Style Manager.
-
Select the “Flared Cuff” style (highlighted).
-
Click the Advanced >> button at the right bottom of the window.
-
The Dependent Measures form opens.
In this list all Prompted measurements are displayed, a D behind a Prompted Measurement indicates that the Style Dependent box is checked. This is also displayed in the list of all measurements in Measure/Edit
-
Put a mark in the “Cuff Depth” check box, and put a mark in the “Cuff Flare” check box. Note: This is not possible when the Style Dependent box is not checked in the Prompted Measurement form (no D visible behind the measure).
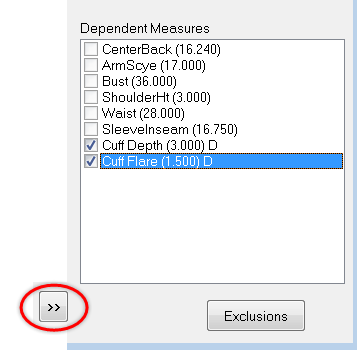
The checked measurements Cuff Depth and Cuff Flare will only be displayed when the user chooses the style Flared Cuff.
In all the styles where these boxes are not checked (everywhere except this one style) these two measurements will not be displayed to the user while running the macro.
And finally, since this flared cuff doesn’t really make sense on a short sleeve, let’s create an exclusion rule for this style Flared Cuff as well.
-
Click via the Advanced >> button the Exclusions button.
-
Put a mark in the “Short Sleeve” check box, and click the “Add” button. The Short Sleeve is added to the column of Exclusion Combinations.
-
Click "OK."

Testing the results
Now save the macro once again and select “Test Macro in PatternMaker.” Go through all the style options and admire the features you’ve added – pictures, sub-styles, style exclusions, and style dependent measurements.