Editing In PatternMaker
One of the most powerful features of the PatternMaker/Macro Generator combination is the ability to create the basic design of a macro in MacroGen and export it to PatternMaker. Then you can use the editing tools of PatternMaker to cut, rotate, move, copy or mirror the pattern pieces. When the changes are sent back to MacroGen, your macro will reflect the changes made in PatternMaker.
You can use this procedure to create options in your macro, such as neckline styles, or pants with pleats vs. darts. Editing with PatternMaker saves you time, because you only have to create the “base” garment in MacroGen one time.
In Tutorial 3 we created a pair of pants with a front dart. In Tutorial 4, we’ll use this editing capability to create a pleated option in the macro. We’re working once again with instructions by Leena Lähteenmäki.
LOAD AN EXISTING MACRO
Start MacroGen and open the Pants macro (Pants.mg4 file) you saved at the end of Tutorial 3. The Style Manager opens automatically.
You could save your macro project now with the "Save as" command in the File menu with a new name like Pants 1. You will keep the original project and create a new file with editing in it. It will be always good to have more then one saved file of your project.
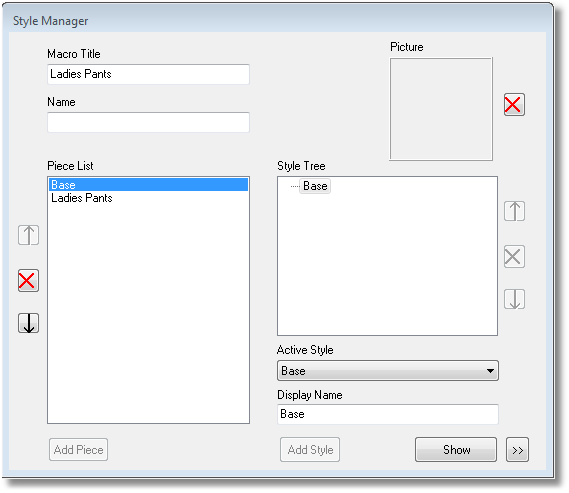
CREATE A NEW STYLE OPTION
Highlight “Ladies Pants” in the Style Tree box, and then type a new style “Pants with Darts” in the Name field:
Click the Add Style button.The new style "Pants with Darts" will be added under "Ladies Pants" in the Style tree as a Style option.
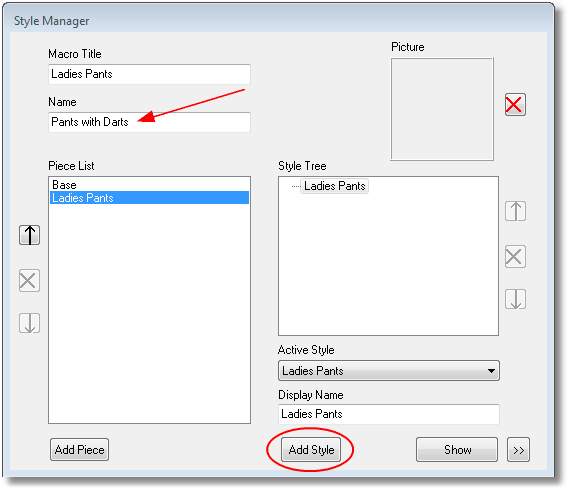

The “Styles” are the options that will be offered in the macro. The “Active Style” field under the Style Name indicates that the Styles you are naming right now will be derived from the Active Style called “Ladies Pants.”

Create another new Style called “Pants with Pleats.”
Type in the name field Pants with Pleats. Click the Add Style button. The second style "Pants with Pleats" will be added under "Ladies Pants" in the Style tree as another Style option.
Select the Style Ladies Pants (it is bluelighted). Click the Show button.
The Pants pattern window opens.
CREATE CUT LINES AND CUT
Leena doesn’t give us very extensive instructions for this alteration, but fortunately it is not a difficult one to do. The first step says:
“Cut the front piece along the center line and from dart apex to the center of the leg cuff.”
We’ll need to create some lines for PatternMaker to cut with. A cut line always has to start and end at a point of the piece or outside the boundaries of the piece ( important with curves) it is cutting. In other words, it has to overlap the borders of the piece to be cut. We will show you both ways in this tutorial.
For making the first cut line conveniently, there’s already a line down the pants’ center front.
The way to make the cut line outside the boundaries of the piece is simply to add a point at either end of the center front line, outside the borders of the pants piece, and create a new object made up of those new points.
Note: There are several options where to create the points and objects for cutting. If you add new points to the parent style, here the Ladies Pants Style, these new points will be shown in all styles under Ladies Pants. It is also possible to add new points and objects to a child’s style. Then these points and objects are not visible in other styles and the parent and can also not be used there. So consider before you add something what you want to do with it and where it is best to be added.
In this case for making the Pants with Pleats we are adding the points and objects, for making the cut, to the parent style.
ADD POINTS FOR FIRST CUT LINE

Create a new Coordinate point named Point 27. Its position will be relative to the point S, since S defines the center front line. Put the new point 5cm directly up from the point S (use Y Fixed distance).
Name |
27 |
From |
S |
Y Fixed Distance |
5 |
Create a point 5cm below Point 1 (Y Measure, Fixed negative Distance). This will represent the end of the first cutting line:
Name |
28 |
From |
1 |
Y Fixed Distance |
-5 |
Tip: When you do not see the new point, click the Zoom All button and all points on the screen will be shown.

NEW OBJECT: CUT LINE 1
Create a New Object called Cut line 1. The object is simply a line, from Point 27 to Point 28. Note that we use the “open” point type when adding Point 28. That means that this line is an “open” object rather than a “closed” one. The end of the object does not return back to the beginning of the object.
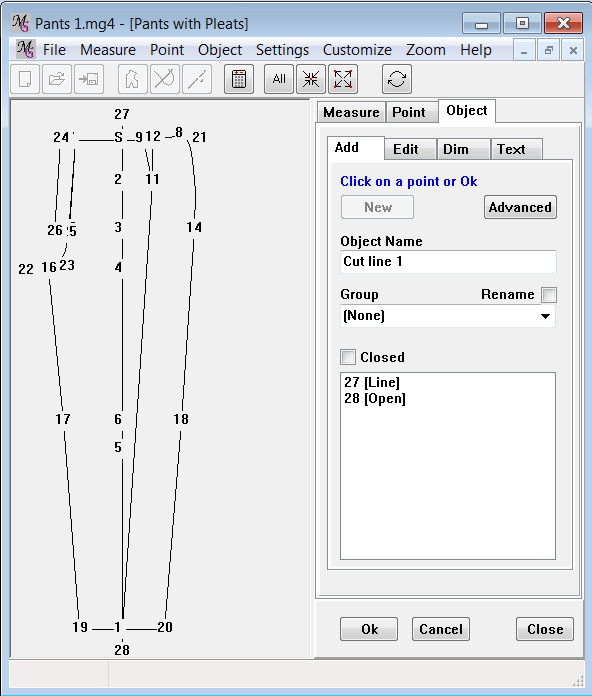
Now your style window should look something like the picture below. (For clarity in this illustration we have turned off some points in the display – Check the Hide boxes in the Point Edit tab. )
Create an open line between 27 and 28
Name |
Cut line 1 |
27 |
Left Mouse (on drawing screen) |
28 |
Left Mouse |
Closed |
Unchecked |
OK (to save the new object)
Important: Whenever the Points form has been opened, you have to exit this tab by clicking Ok or Cancel. If this is not done, a warning message will appear to Ok or Cancel the form.
SECOND CUT LINE
Now we need to create a cut line for the second pleat. The instructions again:
Cut… from dart apex to the center of the leg cuff.
This will be from the dart apex (Point 11 in our drawing) to the center of the leg cuff (Point 1). We will now use points for the cut line that are already part of the object. We can use Point 1 in this case because Point 1 is placed on the center of the straight outside line 19-20 of the pants. We can use also Point 12 as part of the cut line, extended from the dart apex, because it is also part of the piece Pants.
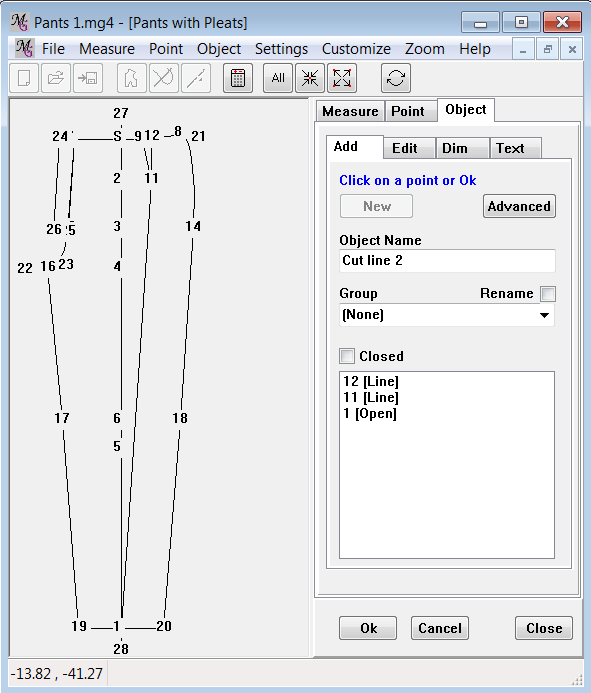
NEW OBJECT: CUT LINE 2
Create a new object called Cut line 2. This line will begin at Point 12, go through the dart apex at Point 11, and end to Point 1 .
-
Create Cut line 2 between points 12, 11 and 1
-
Do not Close the object (uncheck the Closed box).
-
Click OK to close the Object form.
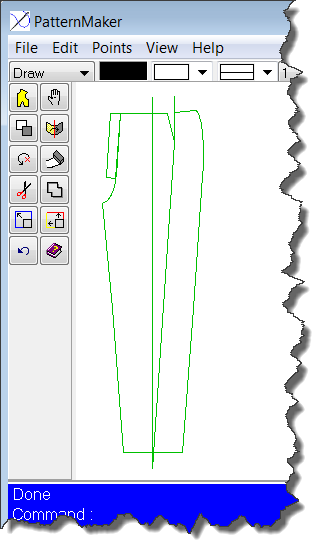
Now your drawing shows the Pants Front piece with the two cutting lines:
Again, Leena’s instructions:
Cut the front piece along the center line…
Now that we’ve drawn the cut lines, we’ll go to PatternMaker to do the actual cutting.
Save the project as Pants 1.mg4. It is important to save always your work before launching PatternMaker and going to the next step.
EDIT MACRO IN PATTERNMAKER

Click the “Edit Macro“ icon on the File icon bar or select the Edit Macro in PatternMaker command from the File menu
PatternMaker will open and automatically run the Ladies Pants macro.
Select “Pants with Pleats” and click “Next.”
No measurements dialog box appears while running the macro in PatternMaker! In the editing function that is disabled.
Note: you are making a choice which style you want to edit.
The editing will be done in the style Pants with Pleats; this means that the style Pants with darts and also the parent style Ladies Pants will not be edited (they will stay original).
When you have made children in a style, you can not edit the parent anymore!!

The drawing of the Pants with Pleats will appear on he screen in atternMaker.
PatternMaker does not have it’s normal outlook. Only those commands, which can be used while editing, are visible in the icon bar and menubar. This means that only a couple of commands can be selected.(see further the Help section about Editing)
While editing the macro the drawing of the pants appears in PatternMaker not in black but in green on the screen. Every piece in the Style tree will appear in its own color (like the colors of the layers in PatternMaker). The Pants piece is the second piece in the Style Tree (Base is the first piece, Pants the second). Like the default colors of the layers in PM the pieces in MG will appear in the same color scheme: piece 1 in black, piece 2 in green, piece 3 in blue, piece 4 in red, etc. The different pieces are not drawn on a different layer like in PM, but only in a different color. While editing the objects it can be handy to see in which order the pieces are made in MG.
When you test the macro or run the macro in PatternMaker the objects are always drawn at layer 0 or the current layer and in the color that is set for that layer.
THE FIRST CUT
Use PatternMaker’s CUT command to cut the pants piece with the line called Cut line 1. (The step-by-step instructions are provided here. However, we recommend that you review these commands in your PatternMaker User’s Manual or Help file.)
Procedure:
Activate the CUT command by clicking on the Cut icon, or select “Cut” from the Edit menu. The prompt on the command line will say: Select object to cut:
Click on the object you want to cut (the pants front piece). It will highlight to indicate that it is selected.
When you have the correct object selected, click the right mouse (RM) button. The command line will say: Select object to cut with:
Select the object that will form the cutting line (the line called “Cut line 1”). This is like a cookie cutter, or like the line the scissors follow when cutting the first object.
After you select the object to be cut with, click the right mouse button (RM). The Pants Front piece will be cut by the cut line. Nothing will appear to have changed in the drawing, because the objects do not move. But PatternMaker says: Done
Close PatternMaker at the right top of the screen and do not save the file. You will return to MacroGen
RETURN TO MacroGen
The change is made in the Pants with Pleats style, so be sure to have opened that style in MacroGen to see the change. As you return to MacroGen, nothing appears to have changed. As in PatternMaker, this is because the pants piece is cut, but has not yet been moved.
Open the Object tab.
After the cut in PatternMaker in the Pants with Pleats style the Pants Front object has been replaced by Pants Front(2) and Pants Front(3). (Note: in the other styles the Pants Front will still exist). Use Hide to turn off one of the Front objects. Check the Hide box from the object called “Pants Front(2)”. The object disappearing verifies that the cut worked.
Experiment with turning objects on and off.
In the Point tab/Edit you will see that new points are made because of the cut in PatternMaker, Points Intersect and Intersect(2), both Line - Line Intersection points.
You can change the names of the points Intersect and Intersect(2) if you do not like these names (for instance in point 29 and 30. Just go to the Points tab. The Edit tab - points list will open by default, open the point and change the name in the point form.
Save your file again as Pants 2.mg4

after the first cut
THE SECOND CUT
Click the Edit Macro button to launch PatternMaker again, select the style Pants with Pleats again and cut the right Pants Front with the Cut line 2. Follow the procedure as described above for the first cut line.
Close PatternMaker, do not save the file and return back to MacroGen. In the style Pants with Pleats in the Object tab you will see what objects you’ve ended up with after the two CUT procedures: Pants Front(4), Pants Front(5) and Pants Front(3), as well as the Cut lines 1 and 2 and the Zipper facing.
The Pants Front(2) has been replaced by 4 and 5, a result of the second cut.
No new intersection points have been made, because the points of the cut line already existed.
Save your file as Pants 3.mg4

after the second cut
Note: Here in short a repetition of how MacroGen handles objects after editing and names them:
-
When you connected points for the first time, you named the object “Pants Front”.
-
In the style option Pant with Pleats this object was at first also "Pants Front".
-
When you cut that front piece the first time, there was no longer one front piece, but two. MacroGen deleted the piece called “Pants Front” in the style Pants with Pleats and replaced it with “Pants Front(3),” the half to the left, and “Pants Front(2),” the half to the right.
-
After “Pants Front(2)” is cut, it is deleted and replaced by “Pants Front(4)” and “Pants Front(5).”
DELETE EXTRA CUT LINES in PatternMaker We no longer need the cut lines, so let’s delete them and clean up this window a bit. Click the Edit Macro button to launch PatternMaker again and select the style Pants with Pleats. Click the “Erase” icon on the Icon toolbar or click “Erase” on the Edit menu:
Select the two cut lines to erase and click RM. The two cut lines are deleted.
Exit PatternMaker.
You don’t have to save the pattern in PM because there is a direct pipeline between PatternMaker and MacroGen.


Note:
You can also delete the cut lines in MacroGen! (Tab Panel/Object/Edit/Delete)
Notice that the cut lines "Cut line1 and Cut line 2 have disappeared from the object list because you have erased them in PatternMaker!
Save you file as Pants 4.mg4
Now that the pieces are cut, we need to rotate the pieces apart, making space for the pleats. We’ll send the file to PatternMaker again to accomplish that.
ROTATE PLEAT SECTIONS
Select Edit Macro to launch PatternMaker. Select the Pants with Pleats option.
The ROTATE command will ask what pieces are to be rotated, at what point they will be rotated around and how much you want to rotate.
Procedure:
-
Activate the ROTATE command by clicking the Rotate icon, or select "Rotate" on the Edit menu.
-
Select the object(s) to rotate by clicking the left mouse button on them. In this case, select the two pants front pieces at the right, Pants Front(4) and Pants Front(5).
-
To stop selecting objects, click the right mouse button (RM). The prompt Rotate about what point? will appear on the command line.
-
Turn on the “Snap To End Point” snap mode (<Ctrl>+<F3>)
-
Click on the point you want the pieces to rotate around – like the center of a clock. This will be Point 1 (= or Intersect), at the center of the pants’ cuff. The prompt Rotation (angle or base point of rotation)? will appear on the command line.
-
There are three ways to rotate something. We’ll tell you here what method to use in this case, but we recommend that you study the User’s Manual and/or Help file for details on the other methods.
Base point and distance: Click on the upper end of the cut line base point. Type “-6” for the rotation distance (minus = rotating clockwise) and press <Enter>. The number represents either inches or centimeters, depending on the Units you are working in. PatternMaker calculates a rotation angle such that the selected point moves the specified distance.
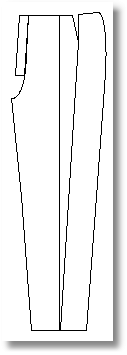
before rotating
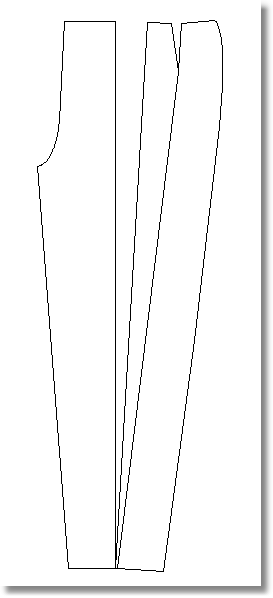
after the first rotation
Exit PatternMaker without saving changes.
Back in MacroGen, notice how the two cut pieces have been rotated. This forms the first pleat of the pants.
The point numbers (in parentheses) indicate the number of times a point occur in the drawing. For example, Point 11 is at first copied into Point 11(2), Point 11 (3) is the second copy of the original Point 11.
Save your file as Pants 5.mg4

Now the last step is to rotate only the far right front piece.
Launch PatternMaker (Edit Macro) and select the pleated option again.
Activate the ROTATE command. Following the instructions above, rotate the far right piece ( “Pants Front(5)”). The point to rotate around is Point 1 at the bottom of the pants. The base point of rotation is the end of the dart at the waist line, point 12(2).Type “-6” for the rotation distance (=clockwise) and press <Enter>.
Exit PatternMaker without saving changes.
Now both pleats have been rotated open.
Tip: If you only want to see the points on the screen that are used in the objects: Go to the Point tab and click the Hide All button. All Points on the screen are hidden. (see fig. 1) Now go to the Objects tab and click with your Right Mouse at the first object Pants Front(4). A help menu opens. When you select Show All Points, all points that are used in all objects are shown. The non-used points stay hidden.(see fig. 2)
If you only want to see the points in Pants front(4) select Show points
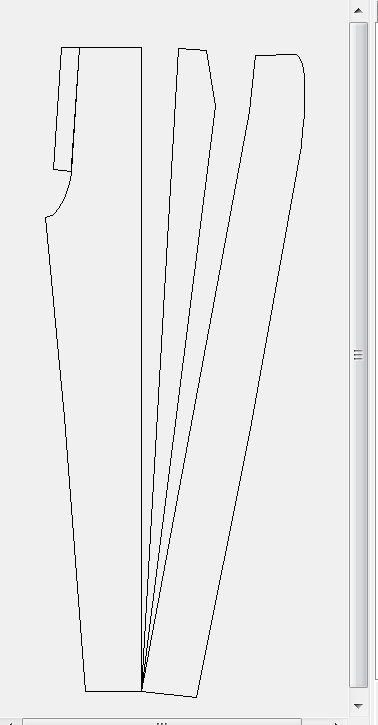
Fig. 1 No points are shown

Fig. 2 Only used points are shown
Save your file .
If you wish to add some lines to form cutting lines at the tops of the pleats, now is the time to do it.
Congratulations! You’ve successfully transferred a macro to and from PatternMaker in order to make changes to the pattern. Your pants macro now has a darted option and a pleated option. Every time you edit in PM or test the macro in PM a .mac file is made from your mg4 file which you can run in PatternMaker.
In the next tutorial, we’ll talk about how to give the user even more garment style options.
Note:
In this example you get a good idea how the editing works in PatternMaker/MacroGen4. You can do several steps at once like cutting and rotate in one step, but we advise you to make not to many steps at once. When afterwards you did not want to do one step you have to go all over again. When you save your project after every step, you save all the different stadia of your editing.
Note:
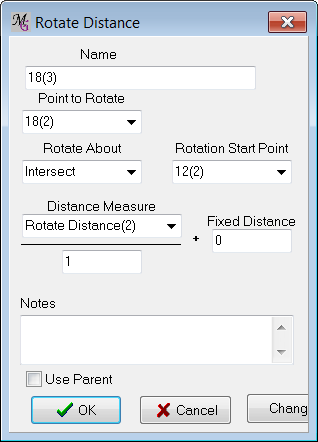
After rotate new measures are made in the Measure list : Rotate Distance and Rotate Distance(2)
After rotate some new points are made in the Point list : 18(3) point type: Rotate Distance which uses the new measure Rotate Distance(2)

See also the Manual for more information about automatic points and measures after editing in PatternMaker!